Sunday, November 30, 2014

One Year Down

One year has gone by in my house and I've got a lot of work done. In this article I'm going to post a few before and after pictures to show the progress I've made. And by me, I mean me and my family and my room mates. because they've helped me a lot this year. In fact, my room mates raked the leaves this weekend just for kicks, which leads me to an aside to the ladies:

Ladies: if you happen to be in a hardware store checking out the gentlemen, go for the dirty ones. Sure, they need to clean up nice when they take you out but if you want a guy that's handy around the house, he'll be dirty when he goes to the hardware store. You don't need to understand why handy guys like to be dirty; you just need to accept it....and buy lots of soap.

I'm grateful in particular for my father. He spends pretty much all of his free time helping me on the house.

So, let's start with some before pictures.


 The lovely red kitchen. I don't have any pictures of the blue in the living room. They all turned out so dark you couldn't see it, but it was also horrendous.


with a leaky faucet


My lawn was dead

there was a weird, unfinished wall between the dining area and the living room.


The hearth was covered in drywall

I'm sure there's something fascinating in this photo, but you can't tell because there was no electricity and thus no lights in the house.


There were broken gate pieces all over the places. and an bad erosion spot where there was almost a retaining wall. Also, the shop is huge, but didn't have any electrical. 

There was a lot of junk lying around like the random tables and chairs on the back porch. Also the porch awning was pretty weird.


A lot of the landscaping was overgrown. 


The roof was a disaster


I had more trees than I needed.

seriously, there was a lot of junk around the place


There was a gaping, jagged brick hole in between the ex-carport and the main house.

So, let me show you some of the work I've done over the year.


Simply painting the kitchen a light color makes it look much much more open. I also fixed the leaky faucet.


Removing that wall lets more light throughout the whole living area and makes the house feel more spacious. (by the way, I painted and reupholstered the chairs on the back porch)


 Removing the drywall from the brick adds an interesting mix of indoor/outdoor themes and mixed materials to the house. The brick alone is gray, so adding some color to it adds nice contrast. It's amazing how small the partial wall made this space feel and how much light it blocked. 


Fixing the erosion spot not only fixed the erosion spot but gave me space for a nice strawberry batch. To the left of the photo is a stone staircase I included in the wall to provide a way to walk to the shop. 


I removed 30-40 trees from my yard, moved a lot of dirt, and got a new roof. In the process we've taken 6-12 loads of junk to the dump and about as many loads of yard waste.


We closed in the gaping jagged hole and put a door in it. (that was a dusty one)

And, while we did a lot more little things, the last thing I want to mention in this post is adding electrical to the shop. 

Before, it was a cave, now it is nice and lit:


excuse the mess, I'm still in the process of putting drywall up to cover any exposed wiring for safety reasons. Once the drywall is up I can put my shelving back and organize my shop again. 

It's been a great year and I still owe you some posts about projects I've finished or that I'm working on, but this is my first blog with more than one post so I feel pretty good about that. 

Don't worry, there's still plenty of work to do on the house so you can keep enjoying my blog for years to come!


Wednesday, August 6, 2014

Moving Dirt and Rolling Rocks

Unfortantely for you all, I didn't get any before and after photos of my rock wall in the back yard. The only one that turned out was this one I took while I was moving the biggest rock in the wall:


It was too big to lift or even roll, so I moved it egyptian style with PVC pipes instead of logs and a come-a-long instead of slaves.

Here's a picture of the wall now. Please note how much joy it brings my room mate Jake and his dog Duke.


Most of the dirt was already there and there was a poorly done rock wall in place that I just redid, but by the time I was done I'd say I had to move about half a yard of dirt from some random dirt piles in another area of my yard. If you're not familiar with landscaping stuff measurements, a yard is about a pickup load with a standard size bed.

Now I'm working on some rock walls out in front. The previous owner had built very large mounds of dirt and piled rocks around them. The bad news is it's a lot of work to make it look nice. The good news is I have plenty of rocks to build a few more walls and I have plenty of dirt to fill in a low spot behind my shop. (I'll post about that one later)

So, here is a before shot from the front moundy area:


And here is how it progressed today. (after pulling eight trees out of that area)


So far we've moved about half a yard of dirt to the low spot behind the shop and I think we're about half way there. There's a lot of work left to do on this mound, but I think it's starting to look better. I'll post updates in a few days when it's done.

Friday, May 30, 2014

Some Landscaping

It's been a few months since my last post. The reason for that is because my last post was for my roof, which was really really ridiculously expensive. So, I'm out of money for a little while and so progress is slow.

So, if you're out of money what do you work on?

Landscaping!

Landscaping is cheap as dirt to do because, well, it's mostly working with dirt. j

I've been working a lot, but mostly on weeding so there hasn't been much to post. This past week though, I started working on my flower beds and those are significantly different.

I almost forgot to take a before picture, but remembered just in time and here it is:


Note the general overgrownness of the flower bed. The trees from left to right are a crabapple (maybe) a silver-leaf maple, a flowering pear (no fruit but pretty flowers) a sumac (in the back) and a pine (might be a dwarf)

The primary shrubbery is oregon grape and there used to be vines back there but I pulled them out a month ago.

Not the strewn rocks. There is a three-layer rock wall that goes from the porch to right about the silver-leaf maple.

The grade is very uneven because in the porch corner of the bed you will find my water cutoff and a sprinkler valve about 3 inches below the side walk level and by the crabapple the grade is above the rock wall by about a foot.

This makes for a very uneven, unmaintainable, overgrown mess.

Step one is to remove the oregon grape. Some people really like it. I do not because it's very aggressive and it's spiny and so hard to weed.

The next step was to cut out a tree or two. I actually didn't mind the quantity of trees so much. (I like a lot of trees) but a few of these were a bad choice this close to my house.


Here is a picture of a fully grown silver leaf maple, which is far to big to be less than 10 feet from my foundation. It's already pretty big and it's just a baby. The sumacs get almost as big and are very aggressive which would mean weeding little sumacs out of my yard constantly.

So, me and my Dad cut down those two trees.


The shrubs are a lot thinner now and the crabapple will need a lot of trimming next season (it's too late to trim this year). It definitely looks like it will be easier to maintain.

I still have a lot of rocks lying around and the grade's not very good, so the next step was to build a rock wall all the way to the corner of the house and do some grading so it looks nice. Here you can see some progress working on the rock wall and the grading.


I tried pulling the trees out by pulling on them with a ratchet strap and cutting the roots, which works great with smaller trees. These trees were too big though, so we just chopped them off at ground level and rasied the grade to cover them. In 5-10 years they'll be rotten and really easy to pull out.

There's also a spicket that was draining into my basement, so we built a little dry creek bed for it to drain.

Here's a photo of the end result.


And here's a photo of the front.


It's really starting to look nice with the new roof line and the repaired beds.

Now I just need to get the sprinklers working right in both beds and plant a few lovely plants.

anyone want to go shrubbery shopping with me?

Tuesday, March 25, 2014

Roof time!

A few weeks ago I looked up in at my ceiling and noticed that there were some wet spots. Not good. Not a surprise either. My roof has had a few patches done over the years, but for the most part it's original. Since my house was built in 1955, the roof was far far overdue to be redone.

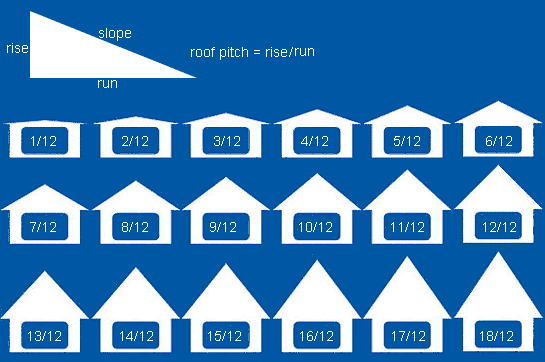
So, first off, my house has a very low-pitch roof. The pitch of the roof is basically its angle, but roofers don't talk about the angle of the roof, they talk about the pitch which is how many feet across to how many feet up it goes.

various roof pitches

In order to use asphalt shingles at all you need at least a 3/12 pitch, but even then you need to do them in a special way. A 4/12 or 5/12 pitch is more common.

One of the coolest architectural features of mid-century modern homes is their low roof pitch. Most of the time they're about a 2/12 pitch. My roof has a 1/12 pitch. Back in the 1950s they'd do a "built up" roof out of tar and gravel. They would basically put paper over the top of the roof just like you would for shingles but instead of putting shingles over that they would spray the whole roof with tar, making it into essentially one gigantic shingle. They would then spread gravel over that to reflect the sun's hot rays in the summer and keep the house from getting so hot. 

I didn't want a built up roof because they're not the best for the environment, leaks can be hard to spot, it's easier to put insulation under a membrane roof, and a membrane roof can do a better job reflecting the sun's radiation.

so, what is a membrane roof you ask. A membrane roof is one where they basically take sheets of waterproof material, spread them over your roof and weld or glue the seams. It's very easy for them to add a few inches of panel insulation to the roof while they're doing it.

So, here's my roof job :)

The first step is to tear off the old roof. This took us about a day and a half with a lot of thanks to My Parents, Corey and his wife Liz, Trent, my room mate Loren, and Jake. 

We did quite a bit of the tear off on a Friday night. Sorry, ladies, that wasn't why I didn't ask any of you out.
Here you can see the "roof patches" They were not done well and were wet underneath.


The sun is setting and there's still a lot of work to do


Getting a little late, but we had to get it done. Right about here my roofer called and asked if we'd looked at the weather radar.


Turns out it was about to rain even though the weather report said 0% chance of precipitation. We ran to the hardware store and bought plastic. Here you see Loren who helped us battle the wind to get this plastic nailed down. 

We got up bright and early the next morning to take all the junk to the dump and tore the plastic and the rest of the old roof off. 

At the same time the roofers came and started doing their installation. I didn't get any photos of that progress but here are some of how it sits now:

half of the roof

the other half of the roof

the original fascia was wood and some of it had to be replaced like this

the front has fascia on one side and none on the other. This looked weird. Also, there was no eave at all which meant water dripping allong the wall. So, we had the roofer add these 2x6s and 2x4s to essentially make a 2 inch eave. 
Metal fascia will go along the eave to give it a uniform roof line all across

here you can see the new roof layers. Below is the wood we replaced on the end. Above that is the sheathing you normally see on the top of a roof. Above that are two 2x4s stacked on top of each other to sit flush with the 4 inches of insulation installed over the roof top. 


Just wanted to show a picture of a slight electrical adjustment we had to make. The power lines sat flush with the house and were bolted to the roof sheathing. SCARY!! We anchored a piece of unistrut to the wall and moved everything to that. 

That's the state of the roof right now. It's water proof but the fascia and soffits haven't been installed. I'll publish an update when they are. For now, enjoy!

UPDATE

The roof is done and looks fantastic!

please enjoy a few photos and try to imagine you can't see the landscaping disaster zone


Thanks for following along!